The String Change Answer for Bigsbyยฎ Trems

Anyone who has used a guitar equipped with a Bigsby tremolo arm knows the frustration of changing strings using the pins native to the system. First, you must use strings with standard ball ends since the hole in the conventional end is what slides over the pin on the Bigsby. Some strings use different styles of ball end, notably Fender Bullets, named for the solid ball end that’s perfectly suited for Fender’s through-the-body stringing with ferrules.

Even with the proper ball end, changing strings is an exercise in frustration, since maintaining enough tension to keep the ball end on the pin makes the rest of your stringing manipulations difficult, such as cutting a string to length, threading the tuner and tightening the string.
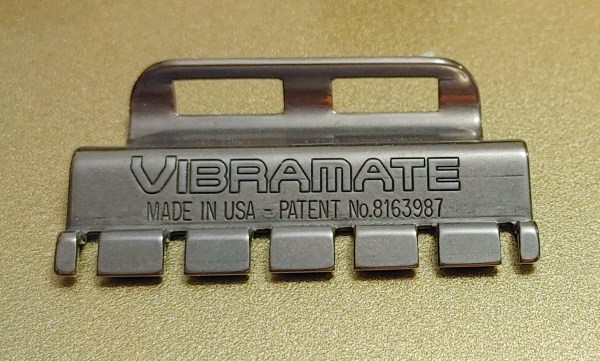
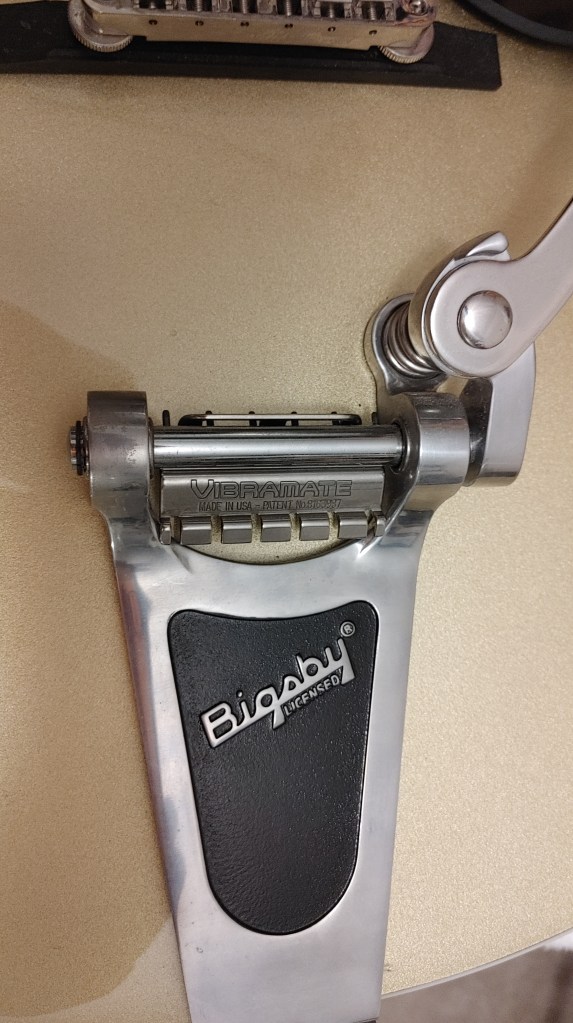
Vibramateยฎ String Spoilerโ„ข

Since this ingenious device from Vibramate does nothing to harm a set of guitar strings, I’ll presume it takes its name from its resemblance to a sports car spoiler. It’s a stainless steel add-on that’s completely reversible and requires no modification to your guitar or to the Bigsby trem itself.

The String Spoiler matches the curve of the Bigsby roller, around which strings are normally threaded. Two rectangular openings on the Spoiler allow the 2nd, 3rd, 4th and 5th string pins to pass through, with pins 1 and 6 situated outside the Spoiler. You need to compress the trem arm to properly position or remove the Spoiler. It might take a moment to establish the orientation of the device. Check against the photos here and it will quickly make sense.

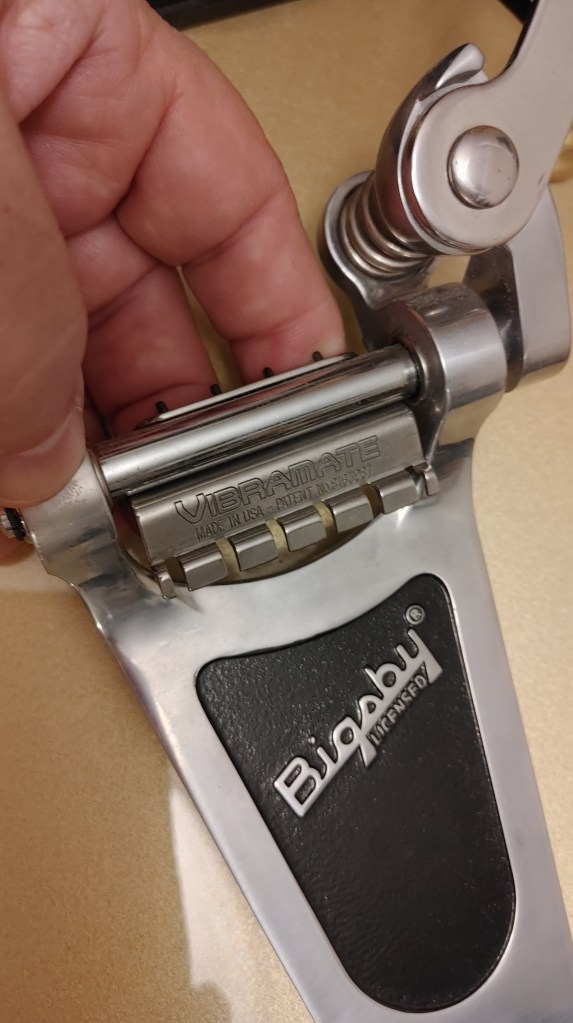
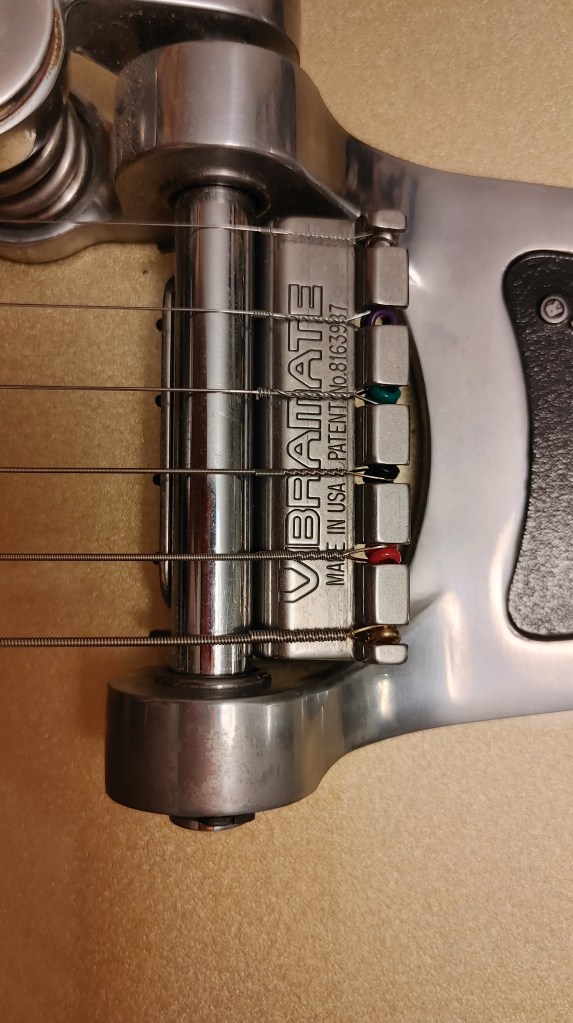
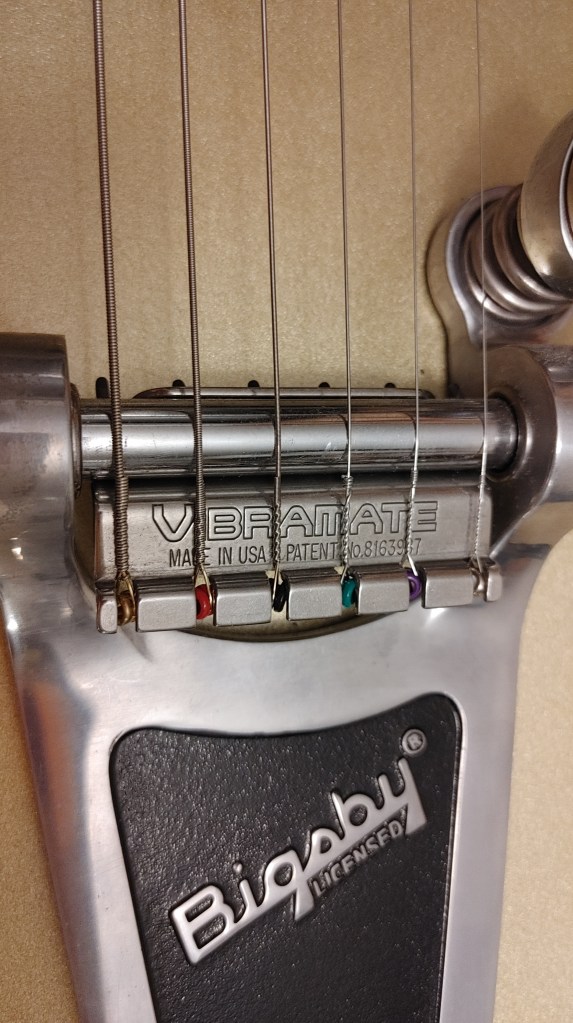
The Vibramate String Spoiler sits loose without strings but won’t fall out of position unless you depress the tremolo arm. Now you have slots through which the ball ends pass, and while you’ll still need to maintain tension on the string as you thread the tuners, it’s a much easier proposition than keeping the ball ends over the pins. The String Spoiler also accepts Fender Bullets and other non-standard ball ends.

Available in three finishes somewhere around the $50 price point, the String Spoiler pays for itself quickly if you put a price on the frustration you no longer have changing strings on a Bigsby trem. Hunt one down today. You won’t regret it.

Breaking the Glaze

There’s nothing quite like the beauty of a flawless gloss finish on a fine guitar, whether vintage nitrocellulose or more contemporary polyurethanes. There is, however, one place where a high gloss finish may not be welcome from a playing perspective, and that’s on the neck.

It’s very much a personal preference, but if you get sweaty hands, particularly in high-humidity festival gigs, the mix of gloss and perspiration can add up to a sticky situation. Suddenly, that jump up to a high fret or glissando dive may be stopped in its tracks by the mix of surface tensions.

There’s an easy modification you can make next time you’re changing strings that adds a silky feel in place of a potential biological glue pot. With some fine-grained silicon carbide wet-dry sandpaper and a light touch, you can knock down the high gloss, leaving behind a fast, smooth surface that feels like heaven to touch, and with apologies to Frankie Valli, you’ll want to hold it so much.

A Player’s Mod

One thing to keep in mind is that this is a destructive modification. You are removing a thin layer of the finish, and though with care you can minimize the aesthetic impact of the change, the resulting appearance of the back of the neck of your guitar will no longer match that of untreated areas. Essentially, you’re going to dull down the gloss to a matte or semi-matte level.

It might help to think of it as a practical relic modification. One of the reasons that old guitars are so cherished is the wear. A guitar with decades of use sees the original gloss finish worn down from the player’s hand, sometimes down to bare wood. Often the neck develops its own gloss again, built up, one assumes, from the skin oils of the player and the polishing action of hand motion. This gloss is more natural, neither as deep and shiny nor as sticky as a factory finish.

I don’t recommend this mod for collectible guitars. It’s all about playability, so if you’re worried about future value of your instrument more than how it feels to play, this is not a change you’ll want to make. On the other hand, it’s a mod that can take an inexpensive axe and make it punch above its weight class in terms of playability.


What You’ll Need

This is decidedly a low-tech mod.

  • One sheet of 1000-grit silicon carbide wet/dry sandpaper (9″ x 3.6″ technically 1/3 sheet I suppose)
  • Microfibre polishing cloth
  • Guitar cleaner/polish, Dunlop no. 65 or similar

The Process

Typically, I’ll do this mod with the strings off, though there’s no real need. It’s logical to do it at a string change since it can get kind of dusty and it’s a good time to clean and polish your guitar prior to re-stringing.

I’ll tear my sandpaper into three pieces, roughly 3 inches square. Usually, I’ll use two of these squares, one for removing the majority of the high gloss and the second for touch-ups after cleaning the first pass.

It’s up to you whether to use the sandpaper wet or dry. I’ve done both and haven’t really noticed a difference. Using it wet may reduce the amount of airborne particles but it’s a little messy. There’s no particular dust problem using the sandpaper dry, but it’s prudent to wear a mask to avoid breathing any.

Be sure that your sandpaper is 1000-grit or higher. Yes, it will clog the paper quickly, but this is not about removing material as much as it’s about changing the surface.

Step 1

Moving along the length of the neck, start lightly sanding. For this photo, I sanded roughly half the neck. Working lengthwise mimics the natural wear that a guitar would accumulate from hand contact.

You’ll feel at first that the sandpaper bites at the finish, but after a few passes the sensation smooths out. This indicates the sandpaper is clogging with the finish coat being removed. It’s normal and when it occurs, just move to an unused portion of your sheet and continue sanding.

I try to remove a similar amount of finish on all areas of the neck right around to the edge of the fretboards. On bound neck guitars, I’ll give the binding the same treatment. On necks without binding, it’s a great time to deal with any ragged fret ends, if you have any.

The extent of the finish removal is up to you. I suggest testing your hand in all normal playing positions and treating the neck to give a uniform feel across these. When you get to profiled areas on the neck and at the heel, remember to work in the direction of the neck as much as possible to limit the creation of cross-neck scratches.

This can be tricky with necks that are still attached to the body, but overall, this is a quick mod, even when you’re taking care with your sanding. Continue until the entire neck has a cloudy, dusty appearance, but don’t be too aggressive with your first pass.

Step 2

Wet your microfibre cloth with the guitar cleaner/polish. It should be moderately damp, but not dripping. Work over the neck to clean up the sanded finish, re-applying more cleaner/polish as needed. You can see from the photo how the cleaner/polish picks up the sanding residue and cloudy appearance.

You’ll also see areas that are still a little glossy. They may appear rippled or just missed. That’s normal and it’s an indication that you’re not over-sanding.

This is where your second piece of sandpaper comes in. You’re going to repeat the sanding process, but only on those areas that still retain full gloss, or to extend your treatment. This is the stage where I usually fine-tune sanding around the headstock and heel.

When you’ve completed your sanding, repeat the cleaning and polishing step. When the neck is dry, slide your hand up and down a few times from a playing position. You’ll be met with a cool, fast and silky feeling.

When you’ve made your second pass and cleaned it up, you’ll have something like this. I’ve left the sanding ragged at the base of the headstock to demonstrate how the 1000-grit sandpaper changes up the gloss to matte.

Compare this with the second photo at the top. Gloss is gone and so is any stickiness when your palm gets moist. Better still, the feeling is great even when moisture is not a problem.

You can see, though, from this final photo, that you are scratching your guitar’s finish, albeit strategically and for a good purpose. The guitar in the photos is an Epiphone Les Paul Standard Pro with an original purchase price between $600 and $700, a mid-level guitar with little potential to appreciate in the future.

I’m of the opinion that guitars are tools to be used. Yes, they’re cool tools. I bought this Paul because the cherry sunburst reminded me of the look of rock and roll in the 1970s, before I learned to play. It has an emotional connection as well as being a playable guitar, and at the end of the day, I do want it to be playable.

Not all guitars with gloss finishes have a gloss finished neck. A Player Series Fender Stratocaster from 2020 came out of the box with a matte factory finish on the back of the neck and the typical high gloss finish on the maple fingerboard. It’s the guitar that really jump-started my desire for that silky feel on other guitars in my collection. As a playable personalization, breaking the glaze can’t be beat.

Scott Shpak, 10/30/2021

Create a website or blog at WordPress.com

Up ↑